")
Création d’un enregistreur autonome de puissance électrique monophasé basé sur un Wemos D1 mini, d’un shield RTC/SD et d’un PZEM004T (Capteur BB1)
23 août 2019Bonjour,
Il y a quelques temps, j’ai reçu comme problématique de trouver une solution pour monitorer la puissance du réseau monophasé sur un site ne disposant pas d’une infrastructure réseau. Je vous propose donc de vous partager ma solution que je nomme BB1 pour BlackBox1 afin que vous puissiez aussi en profiter. Elle sera capable de faire les choses suivantes:
- Être auto-alimentée par le point de mesure et être mise dans un boitier railDIN (ceux utilisé pour les RaspberryPi)
- Mesurer le courant, la tension, la puissance et la consommation (je viens de recevoir la V3 du PZEM004 donc je pense pouvoir avoir le facteur de puissance)
- Horodatage des données et sauvegarde de celles-ci sur une carte SD
- Embarquer son propre serveur wifi avec une page web qui permet de : (voir capture d’écran en pièce-jointe)
- Récupérer directement le fichier CSV des données (je vous mettrai un exemple en fin d’article)
- Écrire directement dans un fichier texte des notes (exemple observations, endroit où est placé le matériel,….)
- Il sera possible dans une prochaine version de la connecter sur un réseau wifi et d’envoyer les données directement sur un serveur distant.
- Être OpenSource et anti-obsolescence programmée (chaque module de la carte peut-être remplacé ou upgradé indépendamment tout en étant rétrocompatible)
- Posséder une sortie permettant de piloter un relais si nécessaire (exemple: lancer automatiquement la machine à café le matin avant l’arrivée de l’équipe ^^)
Pour information, le code source et le typon pour le matériel final seront disponibles à la fin de cet article. Si vous faites un copier/coller du code présent dans cette page, les sources sont sous licence CC-BY-NC-SA https://creativecommons.org/licenses/by-nc-sa/3.0/fr/

Juste un dernier avertisseur, nous allons travailler avec du 220v donc si vous n’avez jamais suivi de formation d’électricien, je vous déconseille fortement de continuer ce tutoriel et dans tous les cas, pensez toujours à déconnecter votre installation de toute source de puissance lorsque vous travaillez sur celle-ci.
Partie 0: Le matériel choisi
Pour ce projet, nous allons utiliser le matériel suivant:
- Un Wemos D1 mini
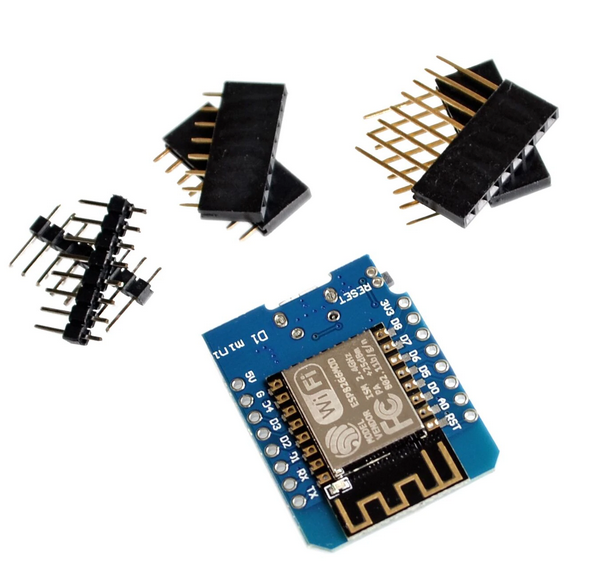
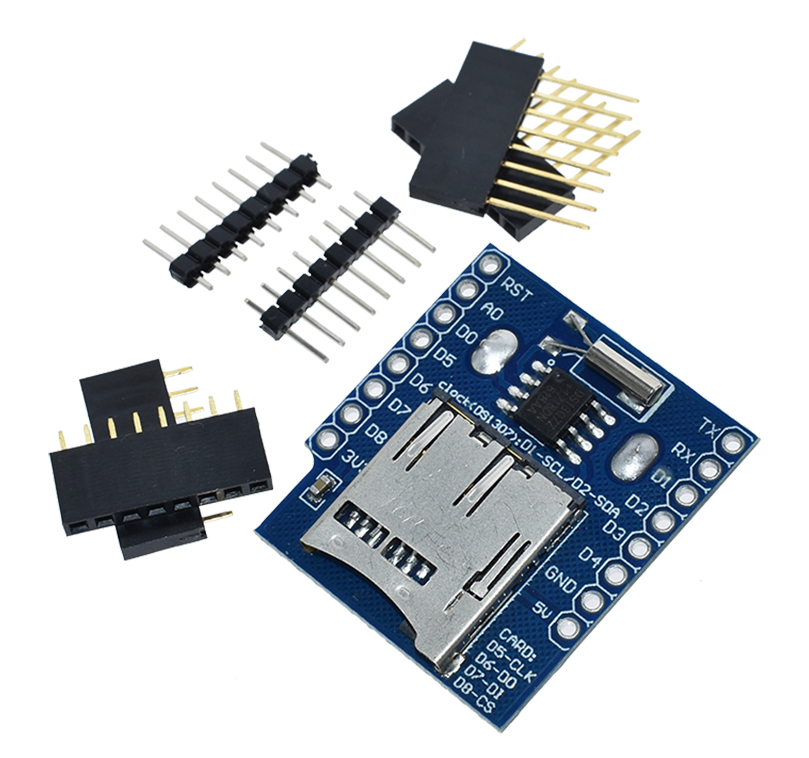
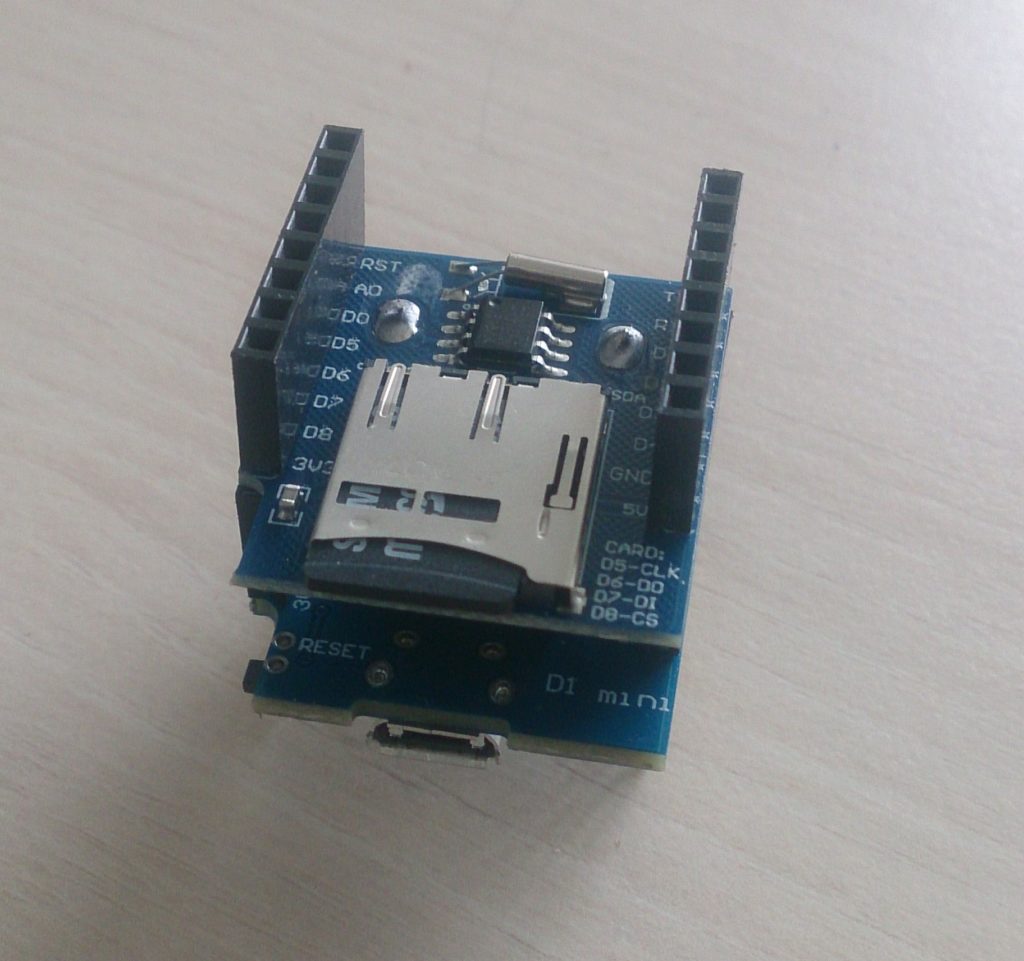
- Un Shield combinant une RTC (Real Time Clock) et un lecteur de carte SD
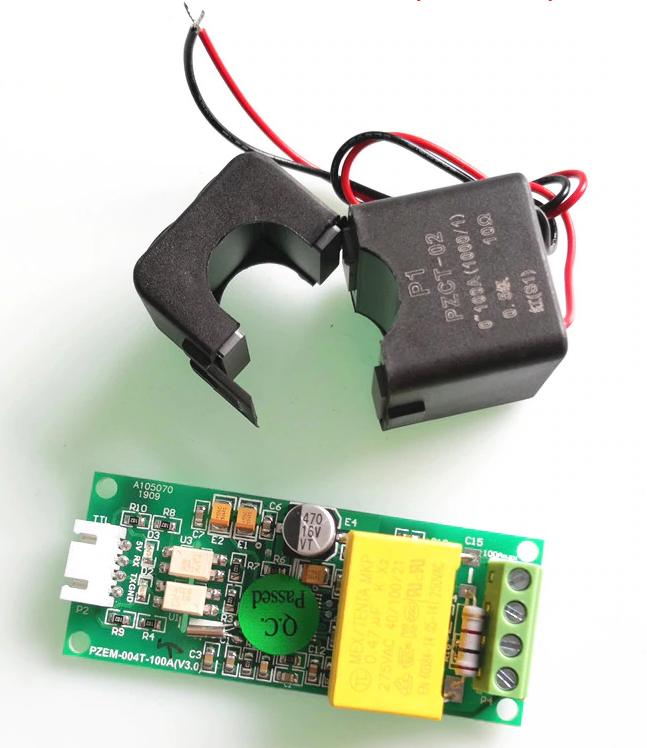
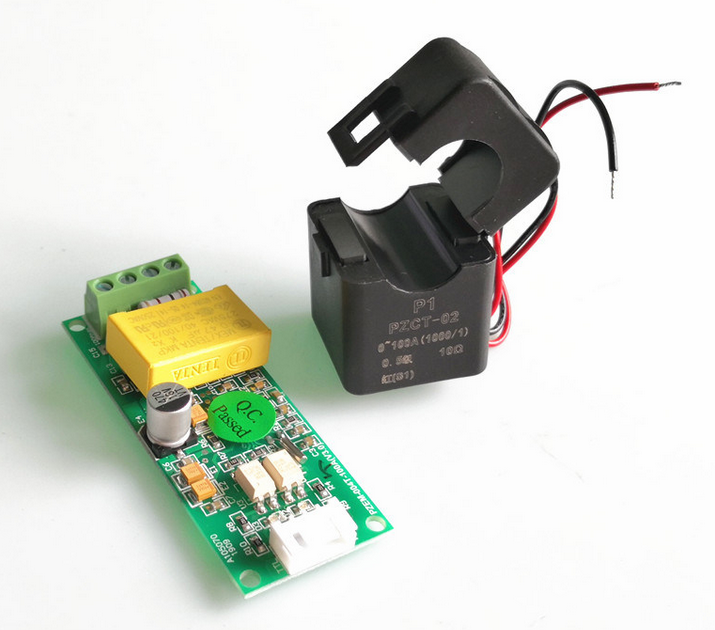
- Un Capteur de puissance PZEM004T (V1 ou V3 seul le code change)
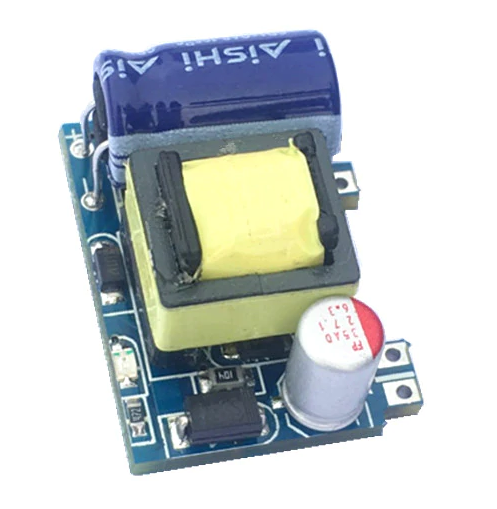
- Un transformateur 220V AC vers 5V DC
- Un Transistor PNP 2N2907 (je vous expliquerai son utilité plus tard)

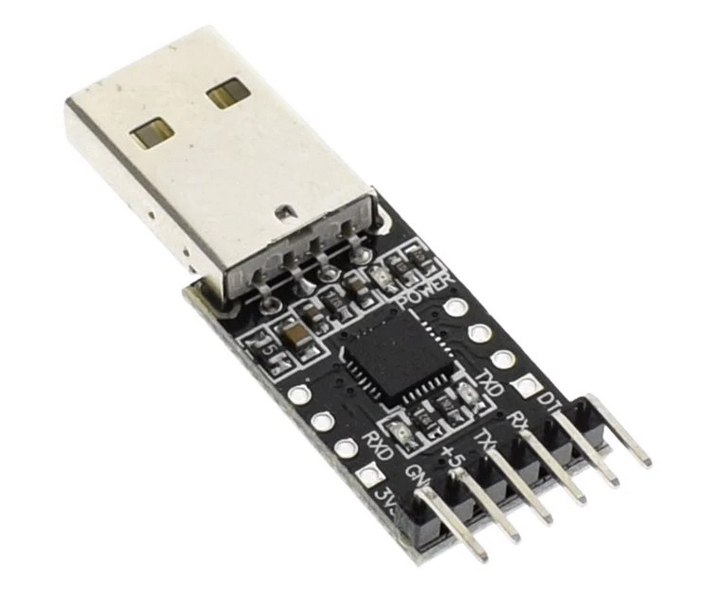
- Un convertisseur TTL vers USB
Partie 1: Lire l’heure sur un Wemos D1 mini
Lorsque l’on veux enregistrer des données (par exemple de consommation), il est important de pouvoir les dater pour pouvoir les analyser correctement. La RTC (Real Time Clock) est un circuit qui nous permet de faire cela. La RTC est une horloge qui est alimentée avec un pile bouton afin de continuer à garder l’heure à jour même quand le montage n’est plus sous tension.
Pour cette première partie, le montage est vraiment simple. Il suffit de placer le shield comportant la RTC sur le Wemos de la façon suivante:
Maintenant il faut relier le Wemos à l’ordinateur et lancer Arduino.
Si vous n’avez jamais utilisé de Wemos, il vous faudra d’abord prendre la bibliothèque esp8266 dans le Gestionnaire de carte
Pour cela, je vous conseille ce wiki qui est vraiment bien fait:
http://www.wikidebrouillard.org/index.php?title=Wemos_D1_mini
Il vous faudra aussi la bibliothèque RTC. Elle est téléchargeable à l’adresse suivante:
https://github.com/adafruit/RTClib
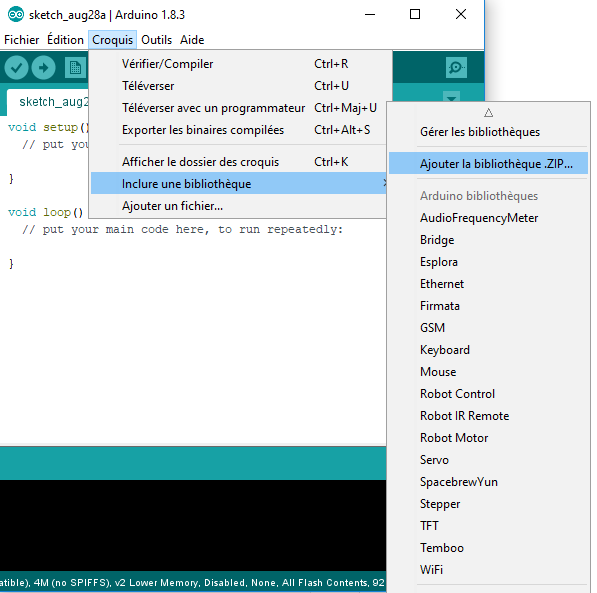
Pour inclure cette librairie, dans l’IDE Arduino, cliquez sur Croquis –> Inclure une bibliothèque –> Ajouter la bibliothèque .Zip et indiquez l’emplacement de votre librairie
Maintenant que tout est OK, vous pouvez configurer l’IDE Arduino de la façon suivante:

Le code sera le suivant:
#include "Wire.h"
#include "RTClib.h"

// RTC variables
RTC_DS1307 rtc;
const int sclPin = D1;
const int sdaPin = D2;
char daysOfTheWeek[7][12] = {"Dimanche", "Lundi", "Mardi", "Mercredi", "Jeudi", "Vendredi", "Samedi"};


void setup () {
// Pinout Setup
  Wire.begin(sdaPin, sclPin);

//Communication Setup
  Serial.begin(57600);
  if (! rtc.begin()) {
    Serial.println("Couldn't find RTC");
    while (1);
  }

  if (! rtc.isrunning()) {
    Serial.println("RTC is NOT running!");
    // following line sets the RTC to the date & time this sketch was compiled
    // rtc.adjust(DateTime(F(__DATE__), F(__TIME__)));
    // This line sets the RTC with an explicit date & time, for example to set
    // January 21, 2014 at 3am you would call:
    rtc.adjust(DateTime(2019, 8, 28, 3, 15, 44)); //
  }

}

void loop () {
// RTC Part
   DateTime now = rtc.now();
    Serial.print(daysOfTheWeek[now.dayOfTheWeek()]);
    Serial.print(",  ");

    if (now.day() < 10)    {Serial.print('0');}
    Serial.print(now.day(), DEC);
    Serial.print('.');
    if (now.month() < 10)  {Serial.print('0');}
    Serial.print(now.month(), DEC);
    Serial.print('.');
    Serial.print(now.year(), DEC);
    Serial.print(",  ");

    if (now.hour() < 10)   {Serial.print('0');}
    Serial.print(now.hour(), DEC);
    Serial.print(':');
    if (now.minute() < 10) {Serial.print('0');}
    Serial.print(now.minute(), DEC);
    Serial.print(':');
    if (now.second() < 10) {Serial.print('0');}
    Serial.print(now.second(), DEC);
    Serial.print(",  ");
    Serial.println();
    delay(1000);
}
Si c'est la première fois que vous mettez en route votre RTC, pensez à modifier la ligne rtc.adjust(DateTime(2019, 8, 28, 3, 15, 44)); // avec une date légèrement dans le futur afin de la calibrer une première fois.
Vous pouvez remarquer que l'on utilise aussi la librairie "wire" afin de forcer l'usage des pin D1 et D2 pour leur assigner la communication I2C.
Flashez le Wemos, ouvrez votre terminal et normalement, vous devriez avoir le résultat suivant:
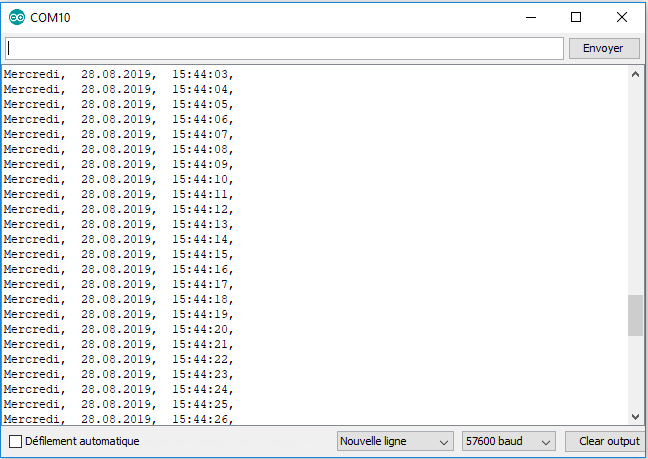
Tadam! vous avez maintenant la possibilité d'horodater vos données!
Partie 2: Enregistrer les données sur une carte SD
Maintenant, nous allons passer à la partie enregistrement des données sur une carte SD.
Ce qui est cool avec le shield choisi, c'est qu'en plus de la RTC, il embarque aussi un support pour carte microSD.
Donc vous l'aurez compris, le montage sera ...... le même que pour la partie précédente!
Pour cette étape, il vous faudra aussi les librairies SD et SPI qui sont normalement embarquées nativement dans l'IDE Arduino grâce à l'ajout de la carte Wemos lors de l'étape précédente.
Avant de charger le code, il faut préparer la carte SD.
Pour cela, il faut la formater en FAT puis créer un fichier vide datalog.txt. Une fois cette opération faite, vous pouvez mettre la carte dans le shield et Flasher le programme suivant sur le Wemos.
#include "SPI.h"
#include "SD.h"

// SDcard variables
const int chipSelect = D8;

void setup () {
//Communication Setup
  Serial.begin(57600);
  Serial.print("Initializing SD card...");

//SDcard Setup
  // see if the card is present and can be initialized:
  if (!SD.begin(chipSelect)) {
    Serial.println("Card failed, or not present");
    // don't do anything more:
    return;
  }
  Serial.println("card initialized.");
}

void loop () {
//SDCARD Part
    File dataFile = SD.open("datalog.txt", FILE_WRITE);
  // if the file is available, write to it:
  if (dataFile) {
    dataFile.print("toto");
    Serial.println("toto");
    dataFile.println();
    dataFile.close();
  }
  // if the file isn't open, pop up an error:
  else {
    Serial.println("error opening datalog.csv");
  }
  delay(10000); //10secondes
}
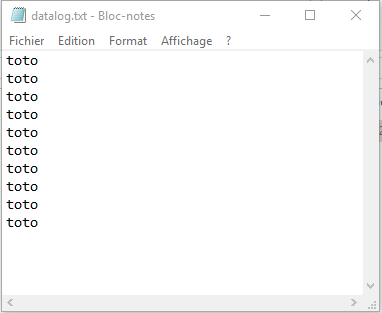
Si vous lancez le terminal, vous devriez voir apparaitre toutes les 10 secondes un toto

Maintenant arrêtez votre montage, enlevez la carte SD et mettez la sur votre PC. Si tout c'est bien passé, vous devriez avoir le fichier datalog.txt qui c'est rempli de totos.
C'est ok? Parfait!!!! Par contre, il est peu pratique de devoir arrêter ses mesures pour les relever... Mais heureusement, le Wemos embarque une puce wifi et nous offre la possibilité de faire notre propre point d'accès wifi!!!
Partie 3: Créer un point d'accès Wifi
Pour notre capteur, comme nous ne savons pas s'il y aura un routeur wifi accessible, j'ai décidé de partir sur la création du point d'accès wifi directement embarqué dans le Wemos.
Pour cela, il existe déjà un code tout fait dans les exemples de l'ESP8266
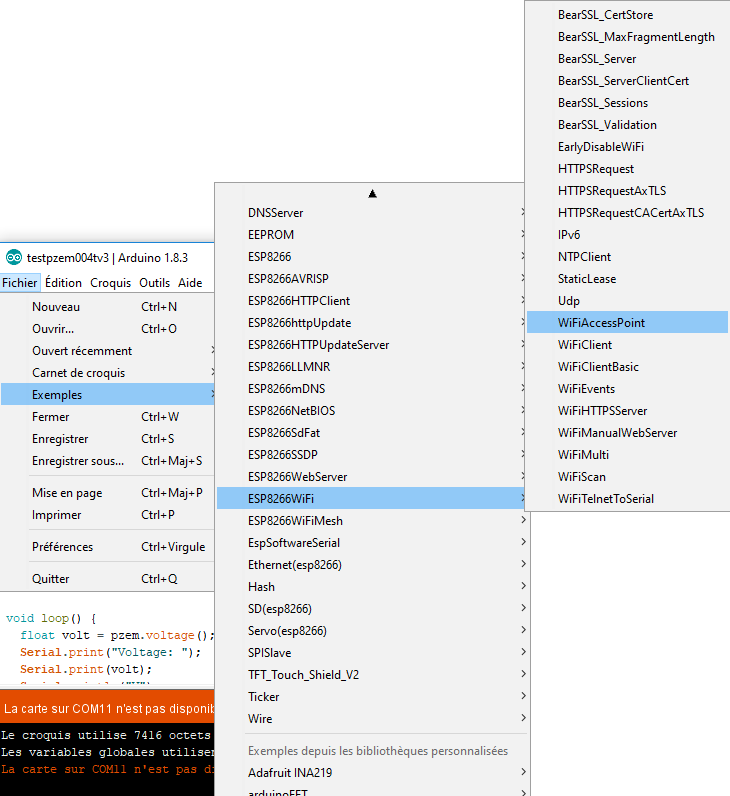
Pensez à changer le SSID ainsi que le mot de passe, flashez le code et ouvrez le terminal
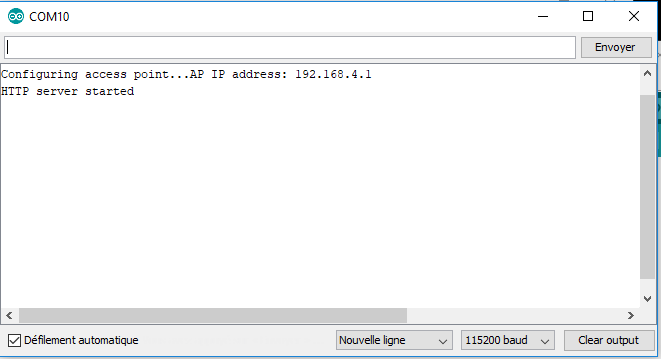
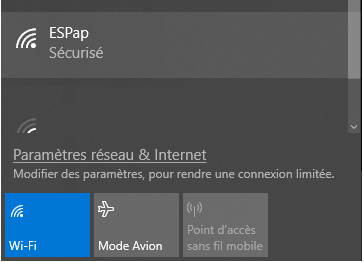
Maintenant connectez vous sur le SSID que vous avez choisi (ici ESPap avec le mot de passe thereisnospoon)
Ouvrez un navigateur internet et tapez l'adresse suivante: 192.168.4.1
Normalement, vous devriez avoir cette page qui apparait.
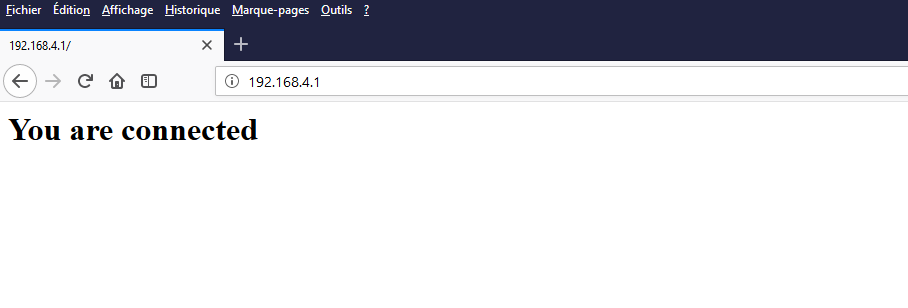
Voilà, nous savons communiquer avec notre Wemos via le réseau Wifi!
Passons aux choses sérieuses en mixant l'usage de la carte SD avec les possibilités du Wifi.
Partie 4: Récupérer des fichiers sur une page Web embarquée
Comme ce que l'on a vu précédemment, ce qui nous intéresse, c'est de pouvoir récupérer un fichier sans devoir arrêter le capteur.
Pour cela, nous allons mixer deux exemples de code et rajouter quelques fichiers sur la carte SD.
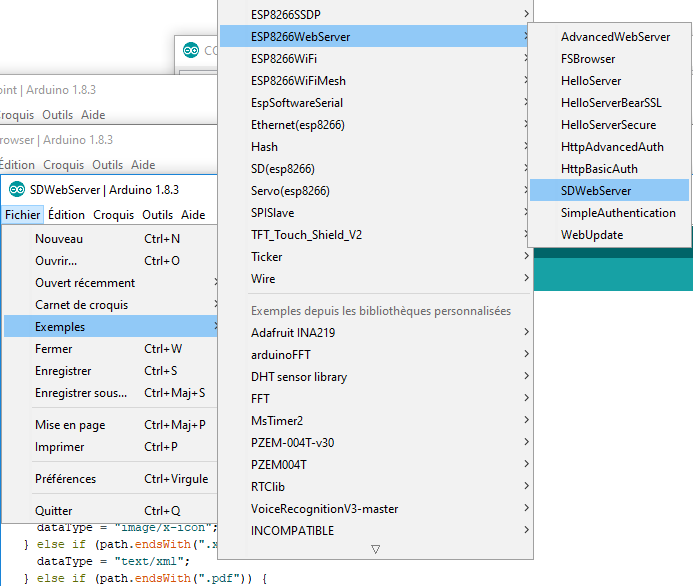
Pour les codes qui seront mélangés, il s'agit du précédent avec le code SDWebServer qui se trouve dans les exemples ESP8266WebServer
Pour faire simple, on va utiliser les parties de création d'un Point d'accès wifi avec la possibilité de pouvoir lire et modifier ce qui existe sur la carte SD via une page WEB.
Le code à Flasher sur le Wemos est le suivant:
#include "SPI.h"
#include "SD.h"
#include "ESP8266WiFi.h"
#include "WiFiClient.h"
#include "ESP8266WebServer.h"

// SDcard variables
static bool hasSD = false;
const int chipSelect = D8;
File uploadFile;

// Wifi Variables
#ifndef APSSID
#define APSSID "ESPap"
#define APPSK  "thereisnospoon"
#endif
/* Set these to your desired credentials. */
int counter =0;
const char *ssid = APSSID;
const char *password = APPSK;
ESP8266WebServer server(80);
/* Just a little test message.  Go to http://192.168.4.1 in a web browser
   connected to this access point to see it.
*/

void returnOK() {
  server.send(200, "text/plain", "");
}

void returnFail(String msg) {
  server.send(500, "text/plain", msg + "\r\n");
}

bool loadFromSdCard(String path) {

  Serial.print(path);
  String dataType = "text/plain";
  if (path.endsWith("/")) {
    path += "index.htm";
  }

  if (path.endsWith(".src")) {
    path = path.substring(0, path.lastIndexOf("."));
  } else if (path.endsWith(".htm")) {
    dataType = "text/html";
  } else if (path.endsWith(".css")) {
    dataType = "text/css";
  } else if (path.endsWith(".js")) {
    dataType = "application/javascript";
  } else if (path.endsWith(".png")) {
    dataType = "image/png";
  } else if (path.endsWith(".gif")) {
    dataType = "image/gif";
  } else if (path.endsWith(".jpg")) {
    dataType = "image/jpeg";
  } else if (path.endsWith(".ico")) {
    dataType = "image/x-icon";
  } else if (path.endsWith(".xml")) {
    dataType = "text/xml";
  } else if (path.endsWith(".pdf")) {
    dataType = "application/pdf";
  } else if (path.endsWith(".zip")) {
    dataType = "application/zip";
  }

  File dataFile = SD.open(path.c_str());
  if (dataFile.isDirectory()) {
    path += "/index.htm";
    dataType = "text/html";
    Serial.print(path.c_str());
    dataFile = SD.open(path.c_str());
  }

  if (!dataFile) {

    return false;
  }

  if (server.hasArg("download")) {
    dataType = "application/octet-stream";
  }

  if (server.streamFile(dataFile, dataType) != dataFile.size()) {
    Serial.println("Sent less data than expected!");
  }

  dataFile.close();

  return true;
}

void handleFileUpload() {
  if (server.uri() != "/edit") {
    return;
  }
  HTTPUpload& upload = server.upload();
  if (upload.status == UPLOAD_FILE_START) {
    if (SD.exists((char *)upload.filename.c_str())) {
      SD.remove((char *)upload.filename.c_str());
    }
    uploadFile = SD.open(upload.filename.c_str(), FILE_WRITE);
    Serial.print("Upload: START, filename: "); Serial.println(upload.filename);
  } else if (upload.status == UPLOAD_FILE_WRITE) {
    if (uploadFile) {
      uploadFile.write(upload.buf, upload.currentSize);
    }
    Serial.print("Upload: WRITE, Bytes: "); Serial.println(upload.currentSize);
  } else if (upload.status == UPLOAD_FILE_END) {
    if (uploadFile) {
      uploadFile.close();
    }
    Serial.print("Upload: END, Size: "); Serial.println(upload.totalSize);
  }
}

void deleteRecursive(String path) {
  File file = SD.open((char *)path.c_str());
  if (!file.isDirectory()) {
    file.close();
    SD.remove((char *)path.c_str());
    return;
  }

  file.rewindDirectory();
  while (true) {
    File entry = file.openNextFile();
    if (!entry) {
      break;
    }
    String entryPath = path + "/" + entry.name();
    if (entry.isDirectory()) {
      entry.close();
      deleteRecursive(entryPath);
    } else {
      entry.close();
      SD.remove((char *)entryPath.c_str());
    }
    yield();
  }

  SD.rmdir((char *)path.c_str());
  file.close();
}

void handleDelete() {
  if (server.args() == 0) {
    return returnFail("BAD ARGS");
  }
  String path = server.arg(0);
  if (path == "/" || !SD.exists((char *)path.c_str())) {
    returnFail("BAD PATH");
    return;
  }
  deleteRecursive(path);
  returnOK();
}

void handleCreate() {
  if (server.args() == 0) {
    return returnFail("BAD ARGS");
  }
  String path = server.arg(0);
  if (path == "/" || SD.exists((char *)path.c_str())) {
    returnFail("BAD PATH");
    return;
  }

  if (path.indexOf('.') > 0) {
    File file = SD.open((char *)path.c_str(), FILE_WRITE);
    if (file) {
      file.write((const char *)0);
      file.close();
    }
  } else {
    SD.mkdir((char *)path.c_str());
  }
  returnOK();
}

void printDirectory() {
  if (!server.hasArg("dir")) {
    return returnFail("BAD ARGS");
  }
  String path = server.arg("dir");
  if (path != "/" && !SD.exists((char *)path.c_str())) {
    return returnFail("BAD PATH");
  }
  File dir = SD.open((char *)path.c_str());
  path = String();
  if (!dir.isDirectory()) {
    dir.close();
    return returnFail("NOT DIR");
  }
  dir.rewindDirectory();
  server.setContentLength(CONTENT_LENGTH_UNKNOWN);
  server.send(200, "text/json", "");
  WiFiClient client = server.client();

  server.sendContent("[");
  for (int cnt = 0; true; ++cnt) {
    File entry = dir.openNextFile();
    if (!entry) {
      break;
    }

    String output;
    if (cnt > 0) {
      output = ',';
    }

    output += "{\"type\":\"";
    output += (entry.isDirectory()) ? "dir" : "file";
    output += "\",\"name\":\"";
    output += entry.name();
    output += "\"";
    output += "}";
    server.sendContent(output);
    entry.close();
  }
  server.sendContent("]");
  dir.close();
}

void handleNotFound() {
  if (hasSD && loadFromSdCard(server.uri())) {
    return;
  }
  String message = "SDCARD Not Detected\n\n";
  message += "URI: ";
  message += server.uri();
  message += "\nMethod: ";
  message += (server.method() == HTTP_GET) ? "GET" : "POST";
  message += "\nArguments: ";
  message += server.args();
  message += "\n";
  for (uint8_t i = 0; i < server.args(); i++) {
    message += " NAME:" + server.argName(i) + "\n VALUE:" + server.arg(i) + "\n";
  }
  server.send(404, "text/plain", message);
  Serial.print(message);
}
// WEBSERVER declaration end


void setup () {
//Communication Setup
  Serial.begin(57600);
  Serial.print("Initializing SD card...");

//SDcard Setup
  // see if the card is present and can be initialized:
  if (!SD.begin(chipSelect)) {
    Serial.println("Card failed, or not present");
    // don't do anything more:
    return;
  }
  Serial.println("card initialized.");
  hasSD = true;


// Wifi setup
  Serial.print("Configuring access point...");
  /* You can remove the password parameter if you want the AP to be open. */
  WiFi.softAP(ssid, password);

  IPAddress myIP = WiFi.softAPIP();
  Serial.print("AP IP address: ");
  Serial.println(myIP);
  server.on("/list", HTTP_GET, printDirectory);
  server.on("/edit", HTTP_DELETE, handleDelete);
  server.on("/edit", HTTP_PUT, handleCreate);
  server.on("/edit", HTTP_POST, []() {
    returnOK();
  }, handleFileUpload);
  server.onNotFound(handleNotFound);

  server.begin();
  Serial.println("HTTP server started");

}

void loop () {
 server.handleClient();
 delay(100);
}
Il faut aussi mettre les fichiers ci-dessous sur la carte SD (ne pas mettre le dossier SDRoot mais directement les fichiers et dossiers qui sont dedans):
Vous pouvez aussi les retrouver dans le dossier de la librairie Arduino du ESP8266 --> ESP8266Arduino-master\Arduino-master\libraries\ESP8266WebServer\examples\SDWebServer\SdRoot
Maintenant que vous avez flashé le Wemos, connectez vous sur le wifi de celui-ci. Une fois cela fais, allez sur la page web suivante: 192.168.4.1/edit
Vous tomberez sur cette page:
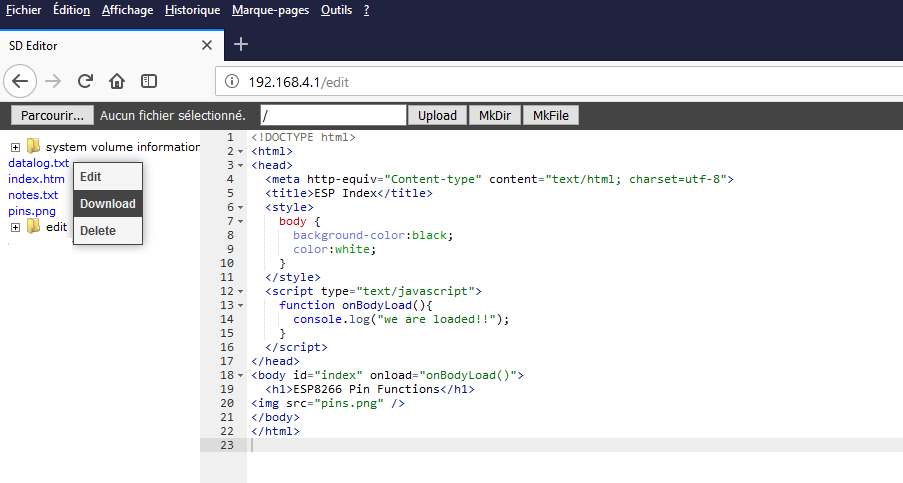
Si vous cliquez droit sur un fichier, vous aurez la possibilité de le modifier, de le télécharger ou de le supprimer. C'est plutôt cool non?
Maintenant que l'on ai capable d'horodater une donnée, de la stocker dans un fichier sur une carte SD et en plus de la récupérer via une page WEB, il nous reste à savoir comment communiquer avec un capteur PZEM004T. Vous êtes prêt? Oui? bon c'est parti!
Partie 5: Mesurer les valeurs électriques avec un PZEM004T
Le but de cette partie est de pouvoir lire un capteur de puissance électrique nommé PZEM004T. Mais que fait donc ce capteur me direz vous? Et bien ça dépend de sa version.
La version 1:
Cette version peut récupérer comme informations:
- La tension du réseau (en V)
- Le courant (en A)
- La puissance active (en W)
- La consommation (en kWh)
| Valeur | Plage de mesure | Résolution | Précision |
|---|---|---|---|
| Tension | 80~260V | 0.1V | 0.5% |
| Courant | 0~10A or 0~100A* | 0.01A or 0.02A* | 0.5% |
| Puissance | 0~2.3kW or 0~23kW* | 0.1W | 0.5% |
| Énergie | 0~9999.99kWh | 1Wh | 0.5% |
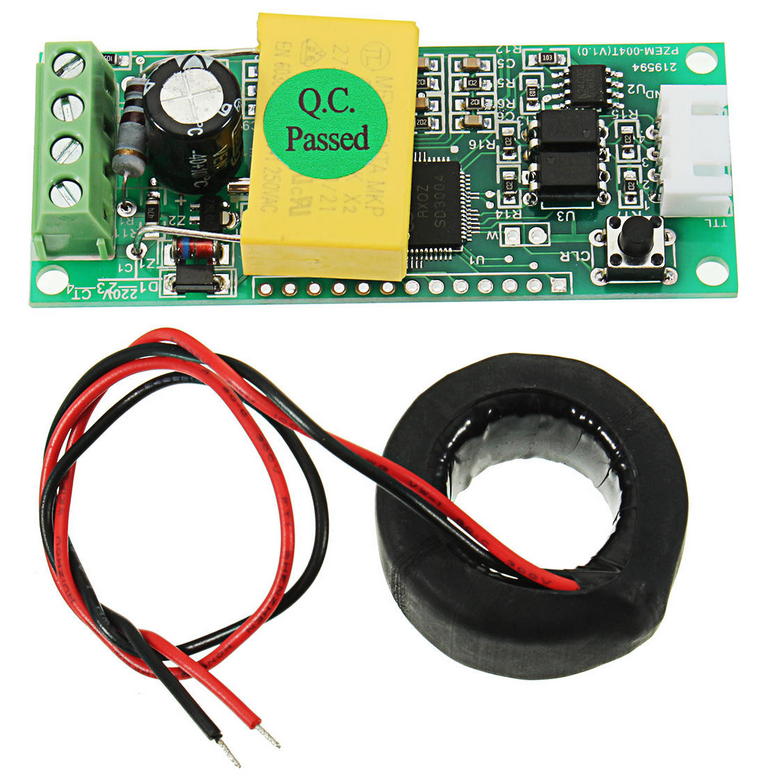
Elle se différencie de la version 3 par son tore (la bobine noire qui permet d'avoir une image du courant qui ne peux pas s'ouvrir dans cette version) et sa possibilité de rajouter un afficheur directement sur le capteur.
La version 3:
Cette version est plus évoluée car elle est capable de mesurer les valeurs suivantes:
| Valeur | Plage de mesure | Résolution | Précision |
|---|---|---|---|
| Tension | 80~260V | 0.1V | 0.5% |
| Courant | 0~10A or 0~100A* | 0.01A or 0.02A* | 0.5% |
| Puissance | 0~2.3kW or 0~23kW* | 0.1W | 0.5% |
| Énergie | 0~9999.99kWh | 1Wh | 0.5% |
| Fréquence | 45~65Hz | 0.1Hz | 0.5% |
| Facteur de puissance | 0.00~1.00 | 0.01 | 1% |
Et il a pour avantage de posséder un tore sécable donc plus besoin de démonter le circuit complet pour l'installer.
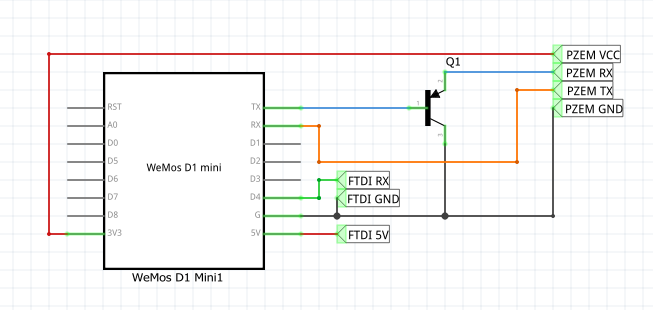
Maintenant que nous connaissons ces capacités, nous pouvons passer à sa mise en œuvre. Au niveau matériel, nous aurons besoin de rajouter un transistor PNP ainsi qu'un convertisseur FTDI TTL <-> USB
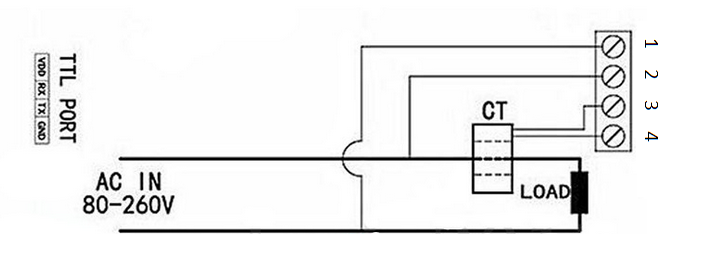
Pour ce qui est du câblage du point de mesure, les 2 versions sont identiques et s'effectue de la façon suivante:
En ce qui concerne le câblage entre le PZEM et le Wemos il y a une légère différence selon la version utilisée.
Version 1:
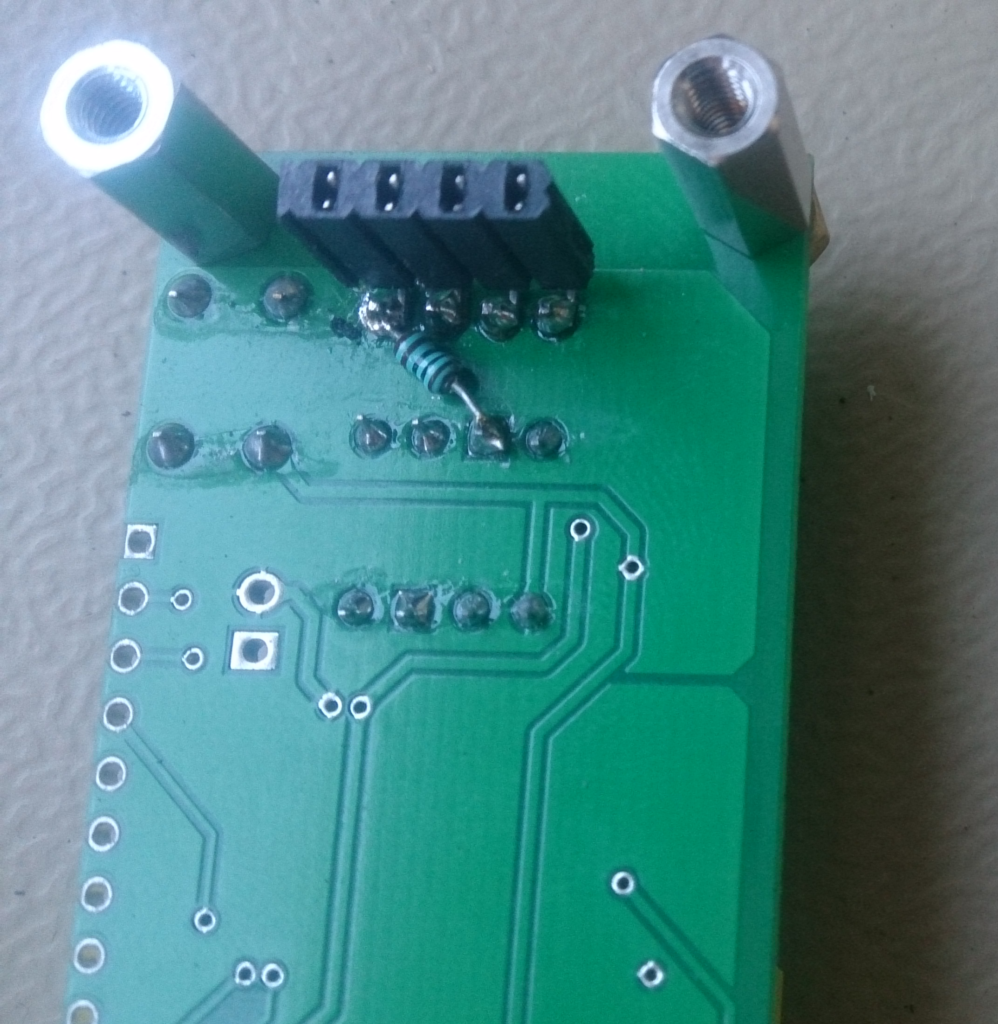
Une modification est aussi à faire sur le PZEM004T v1 afin de le rendre compatible avec le TTL du Wemos qui est en 3.3v. Il faut rajouter une résistance de 1k Ω comme la photo ci-dessous.
Version 3:
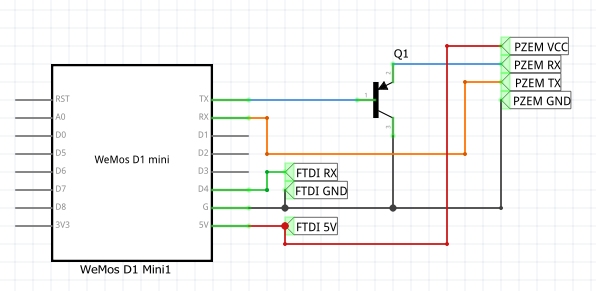
Pas besoin de modification du PZEM pour cette version.
La présence du transistor permet de mettre le GPIO15 du Wemos au 0 logique et lui permettre de booter sur le Flash SPI. Si l'on reliait directement les 2 connecteurs ensemble l'octocoupleur forcerait au 1 logique le GPIO15 ce qui ferait reseter tout le temps le Wemos.
On utilise aussi le convertisseur FTDI TTL<->USB car le Wemos possède 2 UARTs UART0 (qui servira pour la communication avec le PZEM) et UART1 (qui est unidirectionnel ce qui veux dire qu'il ne sert qu'à envoyer des informations mais ne peux pas en récupérer)
Ces explications sont tirées du site: https://github.com/olehs/PZEM004T/wiki/Connecting-PZEM-to-ESP8266
Maintenant que le câblage est fait, passons au code:
Vous aurez besoin de 2 librairies en plus (Une par version de PZEM)
La première pour la version1 se trouve ici: https://github.com/olehs/PZEM004T
La deuxième pour la version 3 se trouve ici: https://github.com/mandulaj/PZEM-004T-v30
Utilisez la même méthode pour les inclurent que pour les librairies précédentes.
Maintenant voici les codes pour chacune des versions:
Version 1:
#include "PZEM004T.h"

// Pzem004 variables
float v = 0;
float i = 0;
float p =0;
float e = 0;
HardwareSerial hwSerial(UART0);     // Use hwSerial1 UART0 at pins GPIO1 (TX) and GPIO3 (RX)
PZEM004T pzem(&hwSerial);           // Attach PZEM to hwSerial1
IPAddress ip(192,168,1,1);
bool pzemrdy = false;

void setup () {
//Communication Setup
  Serial1.begin(57600);

// PZEM004T Setup
  while (!pzemrdy) {
      Serial1.println("Connecting to PZEM...");
      pzemrdy = pzem.setAddress(ip);
      delay(1000);
   }
}

void loop () {
//PZEM Part
  v = pzem.voltage(ip);
  if (v < 0.0) v = 0.0;
   Serial1.print(v);Serial1.print("V; ");
   i = pzem.current(ip);
   if(i >= 0.0){ Serial1.print(i);Serial1.print("A; "); }
  p = pzem.power(ip);
   if(p >= 0.0){ Serial1.print(p);Serial1.print("W; "); }
   e = pzem.energy(ip);
   if(e >= 0.0){ Serial1.print(e);Serial1.print("Wh; "); }
   Serial1.println();
}
Version 3:
#include "PZEM004Tv30.h"

// Pzem004 variables
float v = 0;
float i = 0;
float p =0;
float e = 0;
float freq;
float pf;
HardwareSerial hwSerial(UART0);     // Use hwSerial1 UART0 at pins GPIO1 (TX) and GPIO3 (RX)
PZEM004Tv30 pzem(&hwSerial);           // Attach PZEM to hwSerial1
bool pzemrdy = false;

void setup () {
//Communication Setup
  Serial1.begin(57600);
//PZEM
pzem.setAddress(0x42);
}

void loop () {
//PZEM Part
  v = pzem.voltage();
  if (v < 0.0) v = 0.0;
   Serial1.print(v);Serial1.print("V; ");
   i = pzem.current();
   if(i >= 0.0){ Serial1.print(i);Serial1.print("A; "); }
  p = pzem.power();
   if(p >= 0.0){ Serial1.print(p);Serial1.print("W; "); }
   e = pzem.energy();
   if(e >= 0.0){ Serial1.print(e);Serial1.print("Wh; "); }
  freq = pzem.frequency();
  Serial1.print("Frequency: ");
  Serial1.print(freq);
  Serial1.print("Hz;");
  pf = pzem.pf();
  Serial1.print("PF: ");
  Serial1.println(pf);
}
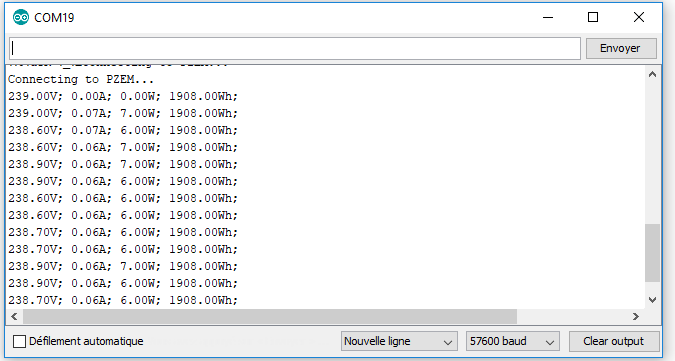
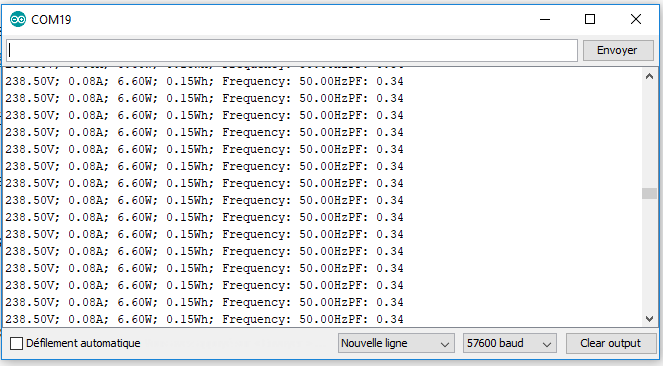
Vous pouvez flasher le Wemos, débrancher le câble USB, mettre en route votre installation électrique et brancher le FTDI sur votre PC. Choisissez ensuite le port COM correspondant et regardez sur le terminal ce que cela donne.
Vous devriez avoir ce genre de résultat:
Version 1:
Version 3:
Voilà maintenant nous maitrisons toutes les facettes du capteur. Nous pouvons maintenant les assembler.
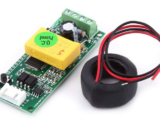
Partie 6: Montage électronique final
J'ai réuni tous les composants sur une plaque test pour tester ensemble et vous montrer les différentes parties.
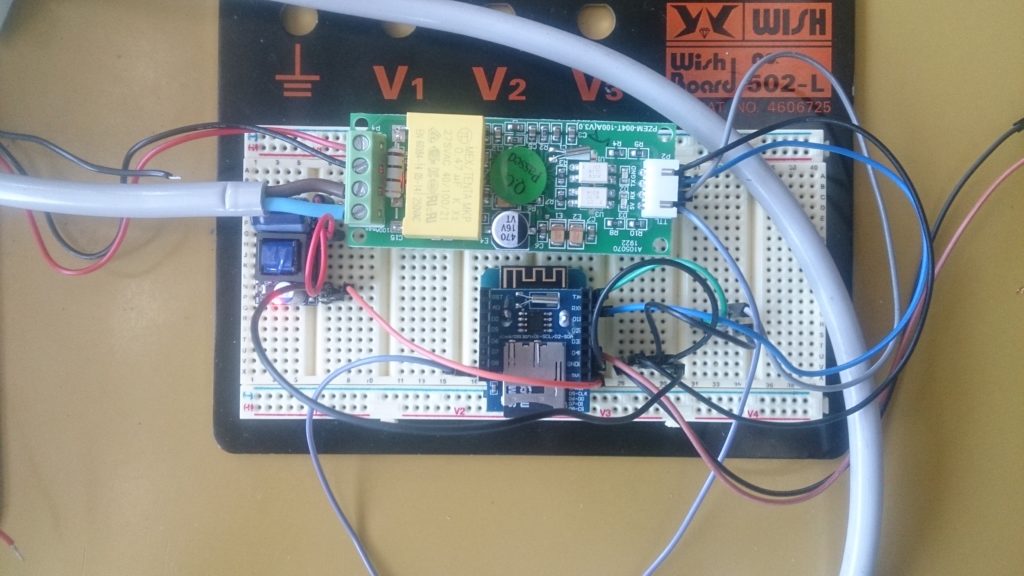
Maintenant que tous les éléments sont testés, il nous reste à les assembler sur une "carte mère" afin de créer notre capteur tout en un qui soit utilisable dans une armoire électrique.
Voici le pdf du typon
Sur le design de la carte, j'ai laissé la possibilité d'avoir un bouton de reset ainsi que d'utiliser la pin D0 en signal d'entrée ou de sortie.
J'ai ajouter le mini transformateur 220v AC vers 5V DC
J'ai aussi modifier le PZEM afin qu'il n'y ai pas de fil volant.
La carte finale normalement donne cela:
Partie 7: Code final
Pour le code final, j'ai apporté quelques menues modifications afin que les données soient écrites dans un fichier .csv et non .txt. J'ai aussi modifié les fichiers de la carte SD afin de mettre le logo du laboratoire.
Pour la version PZEM004T V1
#include "Wire.h"
#include "PZEM004T.h"
#include "RTClib.h"
#include "SPI.h"
#include "SD.h"
#include "ESP8266WiFi.h"
#include "WiFiClient.h"
#include "ESP8266WebServer.h"

// Echantillonage
int temps = 10; //en secondes

// Pzem004 variables
float v = 0;
float i = 0;
float p =0;
float e = 0;
HardwareSerial hwSerial(UART0);     // Use hwSerial1 UART0 at pins GPIO1 (TX) and GPIO3 (RX)
PZEM004T pzem(&hwSerial);           // Attach PZEM to hwSerial1
IPAddress ip(192,168,1,1);
bool pzemrdy = false;

// RTC variables
RTC_DS1307 rtc;
const int sclPin = D1;
const int sdaPin = D2;
char daysOfTheWeek[7][12] = {"Dimanche", "Lundi", "Mardi", "Mercredi", "Jeudi", "Vendredi", "Samedi"};

// SDcard variables
static bool hasSD = false;
const int chipSelect = D8;
File uploadFile;

// Wifi Variables
#ifndef APSSID
#define APSSID "ESPap"
#define APPSK  "thereisnospoon"
#endif
/* Set these to your desired credentials. */
int counter =0;
const char *ssid = APSSID;
const char *password = APPSK;
ESP8266WebServer server(80);
/* Just a little test message.  Go to http://192.168.4.1 in a web browser
   connected to this access point to see it.
*/

// Prototypes des fonctions
void MesureLectureEcriture(void);

void returnOK() {
  server.send(200, "text/plain", "");
}

void returnFail(String msg) {
  server.send(500, "text/plain", msg + "\r\n");
}

bool loadFromSdCard(String path) {

  Serial1.print(path);
  String dataType = "text/plain";
  if (path.endsWith("/")) {
    path += "index.htm";
  }

  if (path.endsWith(".src")) {
    path = path.substring(0, path.lastIndexOf("."));
  } else if (path.endsWith(".htm")) {
    dataType = "text/html";
  } else if (path.endsWith(".css")) {
    dataType = "text/css";
  } else if (path.endsWith(".js")) {
    dataType = "application/javascript";
  } else if (path.endsWith(".png")) {
    dataType = "image/png";
  } else if (path.endsWith(".gif")) {
    dataType = "image/gif";
  } else if (path.endsWith(".jpg")) {
    dataType = "image/jpeg";
  } else if (path.endsWith(".ico")) {
    dataType = "image/x-icon";
  } else if (path.endsWith(".xml")) {
    dataType = "text/xml";
  } else if (path.endsWith(".pdf")) {
    dataType = "application/pdf";
  } else if (path.endsWith(".zip")) {
    dataType = "application/zip";
  }

  File dataFile = SD.open(path.c_str());
  if (dataFile.isDirectory()) {
    path += "/index.htm";
    dataType = "text/html";
    Serial1.print(path.c_str());
    dataFile = SD.open(path.c_str());
  }

  if (!dataFile) {

    return false;
  }

  if (server.hasArg("download")) {
    dataType = "application/octet-stream";
  }

  if (server.streamFile(dataFile, dataType) != dataFile.size()) {
    Serial1.println("Sent less data than expected!");
  }

  dataFile.close();

  return true;
}

void handleFileUpload() {
  if (server.uri() != "/edit") {
    return;
  }
  HTTPUpload& upload = server.upload();
  if (upload.status == UPLOAD_FILE_START) {
    if (SD.exists((char *)upload.filename.c_str())) {
      SD.remove((char *)upload.filename.c_str());
    }
    uploadFile = SD.open(upload.filename.c_str(), FILE_WRITE);
    Serial1.print("Upload: START, filename: "); Serial1.println(upload.filename);
  } else if (upload.status == UPLOAD_FILE_WRITE) {
    if (uploadFile) {
      uploadFile.write(upload.buf, upload.currentSize);
    }
    Serial1.print("Upload: WRITE, Bytes: "); Serial1.println(upload.currentSize);
  } else if (upload.status == UPLOAD_FILE_END) {
    if (uploadFile) {
      uploadFile.close();
    }
    Serial1.print("Upload: END, Size: "); Serial1.println(upload.totalSize);
  }
}

void deleteRecursive(String path) {
  File file = SD.open((char *)path.c_str());
  if (!file.isDirectory()) {
    file.close();
    SD.remove((char *)path.c_str());
    return;
  }

  file.rewindDirectory();
  while (true) {
    File entry = file.openNextFile();
    if (!entry) {
      break;
    }
    String entryPath = path + "/" + entry.name();
    if (entry.isDirectory()) {
      entry.close();
      deleteRecursive(entryPath);
    } else {
      entry.close();
      SD.remove((char *)entryPath.c_str());
    }
    yield();
  }

  SD.rmdir((char *)path.c_str());
  file.close();
}

void handleDelete() {
  if (server.args() == 0) {
    return returnFail("BAD ARGS");
  }
  String path = server.arg(0);
  if (path == "/" || !SD.exists((char *)path.c_str())) {
    returnFail("BAD PATH");
    return;
  }
  deleteRecursive(path);
  returnOK();
}

void handleCreate() {
  if (server.args() == 0) {
    return returnFail("BAD ARGS");
  }
  String path = server.arg(0);
  if (path == "/" || SD.exists((char *)path.c_str())) {
    returnFail("BAD PATH");
    return;
  }

  if (path.indexOf('.') > 0) {
    File file = SD.open((char *)path.c_str(), FILE_WRITE);
    if (file) {
      file.write((const char *)0);
      file.close();
    }
  } else {
    SD.mkdir((char *)path.c_str());
  }
  returnOK();
}

void printDirectory() {
  if (!server.hasArg("dir")) {
    return returnFail("BAD ARGS");
  }
  String path = server.arg("dir");
  if (path != "/" && !SD.exists((char *)path.c_str())) {
    return returnFail("BAD PATH");
  }
  File dir = SD.open((char *)path.c_str());
  path = String();
  if (!dir.isDirectory()) {
    dir.close();
    return returnFail("NOT DIR");
  }
  dir.rewindDirectory();
  server.setContentLength(CONTENT_LENGTH_UNKNOWN);
  server.send(200, "text/json", "");
  WiFiClient client = server.client();

  server.sendContent("[");
  for (int cnt = 0; true; ++cnt) {
    File entry = dir.openNextFile();
    if (!entry) {
      break;
    }

    String output;
    if (cnt > 0) {
      output = ',';
    }

    output += "{\"type\":\"";
    output += (entry.isDirectory()) ? "dir" : "file";
    output += "\",\"name\":\"";
    output += entry.name();
    output += "\"";
    output += "}";
    server.sendContent(output);
    entry.close();
  }
  server.sendContent("]");
  dir.close();
}

void handleNotFound() {
  if (hasSD && loadFromSdCard(server.uri())) {
    return;
  }
  String message = "SDCARD Not Detected\n\n";
  message += "URI: ";
  message += server.uri();
  message += "\nMethod: ";
  message += (server.method() == HTTP_GET) ? "GET" : "POST";
  message += "\nArguments: ";
  message += server.args();
  message += "\n";
  for (uint8_t i = 0; i < server.args(); i++) {
    message += " NAME:" + server.argName(i) + "\n VALUE:" + server.arg(i) + "\n";
  }
  server.send(404, "text/plain", message);
  Serial1.print(message);
}
// WEBSERVER declaration end


void setup () {
// Pinout Setup
  Wire.begin(sdaPin, sclPin);
  pinMode(16,INPUT);

//Communication Setup
  Serial1.begin(57600);

// PZEM004T Setup
  while (!pzemrdy) {
      Serial1.println("Connecting to PZEM...");
      pzemrdy = pzem.setAddress(ip);
      delay(1000);
   }

// RTC Setup
  if (! rtc.begin()) {
    Serial1.println("Couldn't find RTC");
    while (1);
  }
  if (! rtc.isrunning()) {
    Serial1.println("RTC is NOT running!");
    // following line sets the RTC to the date & time this sketch was compiled
    //rtc.adjust(DateTime(F(__DATE__), F(__TIME__)));
    // This line sets the RTC with an explicit date & time, for example to set
    // January 21, 2014 at 3am you would call:
    // rtc.adjust(DateTime(2014, 1, 21, 3, 0, 0));
    rtc.adjust(DateTime(2019, 8, 23, 10, 11, 0));
  }
  Serial1.print("Initializing SD card...");

//SDcard Setup
  // see if the card is present and can be initialized:
  if (!SD.begin(chipSelect)) {
    Serial1.println("Card failed, or not present");
    // don't do anything more:
    return;
  }
  Serial1.println("card initialized.");
  hasSD = true;


// Wifi setup
  Serial1.print("Configuring access point...");
  /* You can remove the password parameter if you want the AP to be open. */
  WiFi.softAP(ssid, password);

  IPAddress myIP = WiFi.softAPIP();
  Serial1.print("AP IP address: ");
  Serial1.println(myIP);
  server.on("/list", HTTP_GET, printDirectory);
  server.on("/edit", HTTP_DELETE, handleDelete);
  server.on("/edit", HTTP_PUT, handleCreate);
  server.on("/edit", HTTP_POST, []() {
    returnOK();
  }, handleFileUpload);
  server.onNotFound(handleNotFound);

  server.begin();
  Serial1.println("HTTP server started");

}

void loop () {
 server.handleClient();
 delay(100);
 counter = counter+1;
 if(counter==(10*temps)){
 MesureLectureEcriture();
 counter =0;
 }
}


void MesureLectureEcriture(){
//PZEM Part
  v = pzem.voltage(ip);
  if (v < 0.0) v = 0.0;
   Serial1.print(v);Serial1.print("V; ");
   i = pzem.current(ip);
   if(i >= 0.0){ Serial1.print(i);Serial1.print("A; "); }
  p = pzem.power(ip);
   if(p >= 0.0){ Serial1.print(p);Serial1.print("W; "); }
   e = pzem.energy(ip);
   if(e >= 0.0){ Serial1.print(e);Serial1.print("Wh; "); }
   Serial1.println();

// RTC Part
   DateTime now = rtc.now();
    Serial1.print(daysOfTheWeek[now.dayOfTheWeek()]);
    Serial1.print(",  ");

    if (now.day() < 10)    {Serial1.print('0');}
    Serial1.print(now.day(), DEC);
    Serial1.print('.');
    if (now.month() < 10)  {Serial1.print('0');}
    Serial1.print(now.month(), DEC);
    Serial1.print('.');
    Serial1.print(now.year(), DEC);
    Serial1.print(",  ");

    if (now.hour() < 10)   {Serial1.print('0');}
    Serial1.print(now.hour(), DEC);
    Serial1.print(':');
    if (now.minute() < 10) {Serial1.print('0');}
    Serial1.print(now.minute(), DEC);
    Serial1.print(':');
    if (now.second() < 10) {Serial1.print('0');}
    Serial1.print(now.second(), DEC);
    Serial1.print(",  ");
    Serial1.println();

//SDCARD Part
    File dataFile = SD.open("datalog.csv", FILE_WRITE);
  // if the file is available, write to it:
  if (dataFile) {
    if (now.day() < 10)    {dataFile.print('0');}
    dataFile.print(now.day(), DEC);
    dataFile.print('-');
    if (now.month() < 10)  {dataFile.print('0');}
    dataFile.print(now.month(), DEC);
    dataFile.print('-');
    dataFile.print(now.year(), DEC);
    dataFile.print("  ");
    if (now.hour() < 10)   {dataFile.print('0');}
    dataFile.print(now.hour(), DEC);
    dataFile.print(':');
    if (now.minute() < 10) {dataFile.print('0');}
    dataFile.print(now.minute(), DEC);
    dataFile.print(':');
    if (now.second() < 10) {dataFile.print('0');}
    dataFile.print(now.second(), DEC);
    dataFile.print(";");
    dataFile.print(v);
    dataFile.print(';');
    dataFile.print(i);
    dataFile.print(';');
    dataFile.print(p);
    dataFile.print(';');
    dataFile.print(e);
    dataFile.println();
    dataFile.close();
  }
  // if the file isn't open, pop up an error:
  else {
    Serial1.println("error opening datalog.csv");
  }
}
Pour le PZEM004T V3
#include "Wire.h"
#include "PZEM004Tv30.h"
#include "RTClib.h"
#include "SPI.h"
#include "SD.h"
#include "ESP8266WiFi.h"
#include "WiFiClient.h"
#include "ESP8266WebServer.h"

// Echantillonage
int temps = 10; //en secondes

// Pzem004 variables
float v = 0;
float i = 0;
float p =0;
float e = 0;
float freq;
float pf;
HardwareSerial hwSerial(UART0);     // Use hwSerial1 UART0 at pins GPIO1 (TX) and GPIO3 (RX)
PZEM004Tv30 pzem(&hwSerial);           // Attach PZEM to hwSerial1
bool pzemrdy = false;

// RTC variables
RTC_DS1307 rtc;
const int sclPin = D1;
const int sdaPin = D2;
char daysOfTheWeek[7][12] = {"Dimanche", "Lundi", "Mardi", "Mercredi", "Jeudi", "Vendredi", "Samedi"};

// SDcard variables
static bool hasSD = false;
const int chipSelect = D8;
File uploadFile;

// Wifi Variables
#ifndef APSSID
#define APSSID "ESPap"
#define APPSK  "thereisnospoon"
#endif
/* Set these to your desired credentials. */
int counter =0;
const char *ssid = APSSID;
const char *password = APPSK;
ESP8266WebServer server(80);
/* Just a little test message.  Go to http://192.168.4.1 in a web browser
   connected to this access point to see it.
*/

// Prototypes des fonctions
void MesureLectureEcriture(void);

void returnOK() {
  server.send(200, "text/plain", "");
}

void returnFail(String msg) {
  server.send(500, "text/plain", msg + "\r\n");
}

bool loadFromSdCard(String path) {

  Serial1.print(path);
  String dataType = "text/plain";
  if (path.endsWith("/")) {
    path += "index.htm";
  }

  if (path.endsWith(".src")) {
    path = path.substring(0, path.lastIndexOf("."));
  } else if (path.endsWith(".htm")) {
    dataType = "text/html";
  } else if (path.endsWith(".css")) {
    dataType = "text/css";
  } else if (path.endsWith(".js")) {
    dataType = "application/javascript";
  } else if (path.endsWith(".png")) {
    dataType = "image/png";
  } else if (path.endsWith(".gif")) {
    dataType = "image/gif";
  } else if (path.endsWith(".jpg")) {
    dataType = "image/jpeg";
  } else if (path.endsWith(".ico")) {
    dataType = "image/x-icon";
  } else if (path.endsWith(".xml")) {
    dataType = "text/xml";
  } else if (path.endsWith(".pdf")) {
    dataType = "application/pdf";
  } else if (path.endsWith(".zip")) {
    dataType = "application/zip";
  }

  File dataFile = SD.open(path.c_str());
  if (dataFile.isDirectory()) {
    path += "/index.htm";
    dataType = "text/html";
    Serial1.print(path.c_str());
    dataFile = SD.open(path.c_str());
  }

  if (!dataFile) {

    return false;
  }

  if (server.hasArg("download")) {
    dataType = "application/octet-stream";
  }

  if (server.streamFile(dataFile, dataType) != dataFile.size()) {
    Serial1.println("Sent less data than expected!");
  }

  dataFile.close();

  return true;
}

void handleFileUpload() {
  if (server.uri() != "/edit") {
    return;
  }
  HTTPUpload& upload = server.upload();
  if (upload.status == UPLOAD_FILE_START) {
    if (SD.exists((char *)upload.filename.c_str())) {
      SD.remove((char *)upload.filename.c_str());
    }
    uploadFile = SD.open(upload.filename.c_str(), FILE_WRITE);
    Serial1.print("Upload: START, filename: "); Serial1.println(upload.filename);
  } else if (upload.status == UPLOAD_FILE_WRITE) {
    if (uploadFile) {
      uploadFile.write(upload.buf, upload.currentSize);
    }
    Serial1.print("Upload: WRITE, Bytes: "); Serial1.println(upload.currentSize);
  } else if (upload.status == UPLOAD_FILE_END) {
    if (uploadFile) {
      uploadFile.close();
    }
    Serial1.print("Upload: END, Size: "); Serial1.println(upload.totalSize);
  }
}

void deleteRecursive(String path) {
  File file = SD.open((char *)path.c_str());
  if (!file.isDirectory()) {
    file.close();
    SD.remove((char *)path.c_str());
    return;
  }

  file.rewindDirectory();
  while (true) {
    File entry = file.openNextFile();
    if (!entry) {
      break;
    }
    String entryPath = path + "/" + entry.name();
    if (entry.isDirectory()) {
      entry.close();
      deleteRecursive(entryPath);
    } else {
      entry.close();
      SD.remove((char *)entryPath.c_str());
    }
    yield();
  }

  SD.rmdir((char *)path.c_str());
  file.close();
}

void handleDelete() {
  if (server.args() == 0) {
    return returnFail("BAD ARGS");
  }
  String path = server.arg(0);
  if (path == "/" || !SD.exists((char *)path.c_str())) {
    returnFail("BAD PATH");
    return;
  }
  deleteRecursive(path);
  returnOK();
}

void handleCreate() {
  if (server.args() == 0) {
    return returnFail("BAD ARGS");
  }
  String path = server.arg(0);
  if (path == "/" || SD.exists((char *)path.c_str())) {
    returnFail("BAD PATH");
    return;
  }

  if (path.indexOf('.') > 0) {
    File file = SD.open((char *)path.c_str(), FILE_WRITE);
    if (file) {
      file.write((const char *)0);
      file.close();
    }
  } else {
    SD.mkdir((char *)path.c_str());
  }
  returnOK();
}

void printDirectory() {
  if (!server.hasArg("dir")) {
    return returnFail("BAD ARGS");
  }
  String path = server.arg("dir");
  if (path != "/" && !SD.exists((char *)path.c_str())) {
    return returnFail("BAD PATH");
  }
  File dir = SD.open((char *)path.c_str());
  path = String();
  if (!dir.isDirectory()) {
    dir.close();
    return returnFail("NOT DIR");
  }
  dir.rewindDirectory();
  server.setContentLength(CONTENT_LENGTH_UNKNOWN);
  server.send(200, "text/json", "");
  WiFiClient client = server.client();

  server.sendContent("[");
  for (int cnt = 0; true; ++cnt) {
    File entry = dir.openNextFile();
    if (!entry) {
      break;
    }

    String output;
    if (cnt > 0) {
      output = ',';
    }

    output += "{\"type\":\"";
    output += (entry.isDirectory()) ? "dir" : "file";
    output += "\",\"name\":\"";
    output += entry.name();
    output += "\"";
    output += "}";
    server.sendContent(output);
    entry.close();
  }
  server.sendContent("]");
  dir.close();
}

void handleNotFound() {
  if (hasSD && loadFromSdCard(server.uri())) {
    return;
  }
  String message = "SDCARD Not Detected\n\n";
  message += "URI: ";
  message += server.uri();
  message += "\nMethod: ";
  message += (server.method() == HTTP_GET) ? "GET" : "POST";
  message += "\nArguments: ";
  message += server.args();
  message += "\n";
  for (uint8_t i = 0; i < server.args(); i++) {
    message += " NAME:" + server.argName(i) + "\n VALUE:" + server.arg(i) + "\n";
  }
  server.send(404, "text/plain", message);
  Serial1.print(message);
}
// WEBSERVER declaration end


void setup () {
// Pinout Setup
  Wire.begin(sdaPin, sclPin);
  pinMode(16,INPUT);

//Communication Setup
  Serial1.begin(57600);
/*
// PZEM004T Setup
  while (!pzemrdy) {
      Serial1.println("Connecting to PZEM...");
      pzemrdy = pzem.setAddress(ip);
      delay(1000);
   }
*/
pzem.setAddress(0x42);

// RTC Setup
  if (! rtc.begin()) {
    Serial1.println("Couldn't find RTC");
    while (1);
  }
  if (! rtc.isrunning()) {
    Serial1.println("RTC is NOT running!");
    // following line sets the RTC to the date & time this sketch was compiled
    //rtc.adjust(DateTime(F(__DATE__), F(__TIME__)));
    // This line sets the RTC with an explicit date & time, for example to set
    // January 21, 2014 at 3am you would call:
    // rtc.adjust(DateTime(2014, 1, 21, 3, 0, 0));
    rtc.adjust(DateTime(2019, 8, 23, 10, 11, 0));
  }
  Serial1.print("Initializing SD card...");

//SDcard Setup
  // see if the card is present and can be initialized:
  if (!SD.begin(chipSelect)) {
    Serial1.println("Card failed, or not present");
    // don't do anything more:
    return;
  }
  Serial1.println("card initialized.");
  hasSD = true;


// Wifi setup
  Serial1.print("Configuring access point...");
  /* You can remove the password parameter if you want the AP to be open. */
  WiFi.softAP(ssid, password);

  IPAddress myIP = WiFi.softAPIP();
  Serial1.print("AP IP address: ");
  Serial1.println(myIP);
  server.on("/list", HTTP_GET, printDirectory);
  server.on("/edit", HTTP_DELETE, handleDelete);
  server.on("/edit", HTTP_PUT, handleCreate);
  server.on("/edit", HTTP_POST, []() {
    returnOK();
  }, handleFileUpload);
  server.onNotFound(handleNotFound);

  server.begin();
  Serial1.println("HTTP server started");

}

void loop () {
 server.handleClient();


 delay(100);
 counter = counter+1;

 if(counter==(10*temps)){
 MesureLectureEcriture();
 counter =0;
 }
}


void MesureLectureEcriture(){
//PZEM Part
  v = pzem.voltage();
  if (v < 0.0) v = 0.0;
   Serial1.print(v);Serial1.print("V; ");
   i = pzem.current();
   if(i >= 0.0){ Serial1.print(i);Serial1.print("A; "); }
  p = pzem.power();
   if(p >= 0.0){ Serial1.print(p);Serial1.print("W; "); }
   e = pzem.energy();
   if(e >= 0.0){ Serial1.print(e);Serial1.print("Wh; "); }
  freq = pzem.frequency();
  Serial1.print("Frequency: ");
  Serial1.print(freq);
  Serial1.print("Hz");
  pf = pzem.pf();
  Serial1.print("PF: ");
  Serial1.println(pf);

// RTC Part
   DateTime now = rtc.now();
    Serial1.print(daysOfTheWeek[now.dayOfTheWeek()]);
    Serial1.print(",  ");

    if (now.day() < 10)    {Serial1.print('0');}
    Serial1.print(now.day(), DEC);
    Serial1.print('.');
    if (now.month() < 10)  {Serial1.print('0');}
    Serial1.print(now.month(), DEC);
    Serial1.print('.');
    Serial1.print(now.year(), DEC);
    Serial1.print(",  ");

    if (now.hour() < 10)   {Serial1.print('0');}
    Serial1.print(now.hour(), DEC);
    Serial1.print(':');
    if (now.minute() < 10) {Serial1.print('0');}
    Serial1.print(now.minute(), DEC);
    Serial1.print(':');
    if (now.second() < 10) {Serial1.print('0');}
    Serial1.print(now.second(), DEC);
    Serial1.print(",  ");
    Serial1.println();

//SDCARD Part
    File dataFile = SD.open("datalog.csv", FILE_WRITE);
  // if the file is available, write to it:
  if (dataFile) {
    if (now.day() < 10)    {dataFile.print('0');}
    dataFile.print(now.day(), DEC);
    dataFile.print('-');
    if (now.month() < 10)  {dataFile.print('0');}
    dataFile.print(now.month(), DEC);
    dataFile.print('-');
    dataFile.print(now.year(), DEC);
    dataFile.print("  ");
    if (now.hour() < 10)   {dataFile.print('0');}
    dataFile.print(now.hour(), DEC);
    dataFile.print(':');
    if (now.minute() < 10) {dataFile.print('0');}
    dataFile.print(now.minute(), DEC);
    dataFile.print(':');
    if (now.second() < 10) {dataFile.print('0');}
    dataFile.print(now.second(), DEC);
    dataFile.print(";");
    dataFile.print(v);
    dataFile.print(';');
    dataFile.print(i);
    dataFile.print(';');
    dataFile.print(p);
    dataFile.print(';');
    dataFile.print(e);
    dataFile.print(';');
    dataFile.print(pf);
    dataFile.print(';');
    dataFile.print(freq);
    dataFile.println();
    dataFile.close();
  }
  // if the file isn't open, pop up an error:
  else {
    Serial1.println("error opening datalog.csv");
  }
}
Partie 8: Analyse des données
Maintenant que tout est fini, on peut brancher le datalogger BB1 sur son point de mesure final et venir de temps en temps chercher le fichier datalog.csv
On peut ensuite extraire les données fichier datalog.csv afin d'analyser celle-ci. (Attention en fonction de la version du logiciel que vous utilisé, il faudra remplacer les points par des virgules)
Voilà ce tutoriel est fini. J'espère qu'il vous sera utile.
Ci-dessous l'archive avec toutes les sources utilisées.
N'hésitez pas à me faire des retours sur l'utilisation de vos dataloggeurs et je vous souhaite une bonne expérimentation.
Jérôme Ferrari

[…] Pour cela, nous allons un capteur que nous avions vu dans l’article précédent, le PZEM004T V3. http://miniprojets.net/index.php/2019/08/23/creation-dun-enregistreur-autonome-de-puissance-electriq… […]
[…] Pour cela, nous allons un capteur que nous avions vu dans l’article précédent, le PZEM004T V3. http://miniprojets.net/index.php/2019/08/23/creation-dun-enregistreur-autonome-de-puissance-electriq… […]
For ESP32 i receive
error: ‘UART0’ was not declared in this scope
HardwareSerial hwSerial(UART0); // Use hwSerial1 UART0 at pins GPIO1 (TX) and GPIO3 (RX)
^
exit status 1
‘UART0’ was not declared in this scope
Please help
Hi, do you use wemos or just Esp32 ?
[…] Pour commencer à programmer le Wemos, il faut d’abord configurer l’IDE Arduino. Pour cela, je vous laisse jeter un coup d’oeil à mon précédent article: http://miniprojets.net/index.php/2019/08/23/creation-dun-enregistreur-autonome-de-puissance-electriq… […]
Bonjour,
Pourquoi le BB1 est-il vide ?
Pourquoi avoir supprimer tous les include ?
Merci
Bonjour,
il s’agit d’un bug d’affichage du à la mise à jour de wordpress.
Les codes se trouve dans le ficheir zip à la fin de l’article.
Bonne journée,
Jérôme
I had the some issues (not being able to use hardSerial connected to PZEM004) using Lolin wemos D1 mini V4.
I also found that V4 design was different than original design (using CH340 chip)
in original design, ESP8266 chip RX and TX are connected to Board RX and TX outputs and connected to TX and RX CH340 pins trough 470 ohm resistors.
in V4 design ESP8266 chip RX pin is directly connected to CH340 TX pin (no resistor) and ESP8266 chip TX pin is connected to a 470 ohm resistor before TX board output and then connected to CH340 RX pin
I resolved the issue by unsoldering and lifting RX and TX CH340 pins and connecting 470 ohm resistors as well as removing existing 470 ohm resistor ans replacing it by a small wire.
All work perfectly
Voir photos sur: https://github.com/probonopd/WirelessPrinting/issues/133